Leapcell에 Puppeteer 앱 배포하기
아래 �해결 방법으로 문제가 해결되지 않으면 Leapcell Discord 커뮤니티에 가입하여 추가 지원을 받으세요.
Leapcell에 Puppeteer 서비스를 배포하여 스크린샷, PDF를 생성하고 싱글 페이지 앱을 크롤링하거나 프론트엔드 코드 테스트를 자동화할 수 있습니다.
계속하려면 GitHub 계정이 필요합니다. 계정이 없는 경우 GitHub 웹사이트에서 만들 수 있습니다.
1. GitHub에서 puppeteer-crawler를 포크하세요.
Repo: puppeteer-crawler
웹 페이지의 스크린샷을 생성하는 간단한 Puppeteer 스크립트는 다음과 같습니다.
const express = require('express');
const app = express();
// Import Puppeteer for browser automation
const puppeteer = require('puppeteer');
const bodyParser = require('body-parser');
const base64 = require('base64-js');

// Set EJS as the template engine
app.set('view engine', 'ejs');
// Set the directory for views
app.set('views', __dirname + '/views');

// Use body-parser to parse form data
app.use(bodyParser.urlencoded({ extended: true }));

// Handle GET requests and render the initial page
app.get('/', (req, res) => {
  res.render('success', {
    url: 'https://news.ycombinator.com',
    screenshot_base64: '',
    links: [],
    page_title: null,
  });
});

// Handle POST requests to take a screenshot
app.post('/', async (req, res) => {
  // Get the URL from the form, default to Hacker News
  let url = req.body.url || 'https://news.ycombinator.com';
  // Add 'https://' if the URL doesn't start with 'http'
  if (!url.startsWith('http')) {
    url = 'https://' + url;
  }

  let browser;
  try {
    // Launch a headless Chrome browser with specific arguments
    browser = await puppeteer.launch({
      headless: true, // Run the browser in headless mode
      args: [
        '--single-process',
        '--no-sandbox',
        '--disable-setuid-sandbox',
        '--disable-gpu',
        '--no-zygote',
        '--disable-dev-shm-usage',
      ],
      // Use the stable version of Chrome
      // use specific path to the Chrome executable, because the default path may not work.
      // we have to download the Chrome executable and put it in the project directory.
      executablePath: './google-chrome-stable',
    });
    // Create a new browser page
    const page = await browser.newPage();
    // Navigate to the specified URL and wait until the network is idle
    await page.goto(url, { waitUntil: 'networkidle2', timeout: 0 });
    // Take a screenshot of the page
    const screenshot = await page.screenshot();
    // Get the page title
    const page_title = await page.title();

    // Extract all <a> tags' links and text content
    const links_and_texts = await page.evaluate(() => {
      const anchors = document.querySelectorAll('a');
      return Array.from(anchors).map((anchor) => {
        const text = anchor.textContent.replace(/<[^>]*>/g, '').trim();
        return {
          href: anchor.href,
          text: text,
        };
      });
    });

    // Convert the screenshot to a base64 string
    const screenshot_base64 = base64.fromByteArray(screenshot);

    // Render the success page with relevant data
    res.render('success', {
      url,
      page_title,
      screenshot_base64,
      links: links_and_texts,
    });
  } catch (e) {
    // Close the browser if an error occurs
    if (browser) {
      await browser.close();
    }
    // Render the error page with the error message
    res.render('error', { error_message: e.message });
  } finally {
    // Ensure the browser is closed after all operations
    if (browser) {
      await browser.close();
    }
  }
});

// Set the port, use environment variable PORT or default to 8080
const port = process.env.PORT || 8080;
// Start the server
app.listen(port, () => {
  console.log(`Server is running on port ${port}`);
});
전제 조건
애플리케이션을 실행하기 전에 Puppeteer 환경을 준비해야 합니다. 이렇게 하려면 다음 스크립트를 실행하세요.
sh prepare_puppeteer_env.sh
이것은 다음을 수행합니다.
- Puppeteer 및 해당 종속성을 설치합니다(Google Chrome을 사용하므로 Chromium을 다운로드하지 않음).
- Google Chrome을 사용자 환경에 설치합니다.
- Puppeteer 실행에 필요한 종속성을 설정합니다.
프로젝트 구조
.
├── LICENSE                           # 프로젝트 라이선스 파일
├── package.json                      # Node.js 프로젝트에 대한 메타데이터 및 종속성 포함
├── prepare_puppeteer_env.sh           # Puppeteer 환경 설정 스크립트
└── src
    ├── app.js                        # Express 및 Puppeteer를 사용하는 기본 애플리케이션 진입점
    └── views
        ├── error.ejs                 # 문제가 발생했을 때 표시되는 오류 페이지 템플릿
        ├── partials
        │   └── header.ejs            # 페이지 간에 공유되는 헤더 템플릿
        └── success.ejs               # 스크랩된 링크를 보여주는 성공 페이지 템플릿
애플리케이션 실행
환경을 준비한 후 다음 명령으로 웹 서비스를 시작할 수 있습니다.
npm start
이 서비스는 http://localhost:8080에서 사용할 수 있으며 스크랩하려는 페이지의 URL을 입력할 수 있습니다. 해당 페이지의 모든 링크 목록을 반환합니다.
prepare_puppeteer_env.sh에 대한 설명
이 스크립트는 Puppeteer를 실행하는 데 필요한 환경을 설정하는 역할을 합니다. 각 줄이 수행하는 작업에 대한 분석은 다음과 같습니다.
#!/bin/bash

# 명령어가 0이 아닌 상태로 종료되면 즉시 종료
set -e

# --- 1. 일반 설정 ---
# 번들 Chromium을 다운로드하지 않고 Puppeteer 설치
PUPPETEER_SKIP_CHROMIUM_DOWNLOAD=true npm install puppeteer

# apt 목록을 업데이트하고 두 브라우저 모두에 필요한 일반 글꼴 및 라이브러리 설치
echo "INFO: 일반 글꼴 및 라이브러리 설치 중..."
apt-get update
apt-get install -y \
    fonts-ipafont-gothic \
    fonts-wqy-zenhei \
    fonts-thai-tlwg \
    fonts-kacst \
    fonts-freefont-ttf \
    libxss1 \
    --no-install-recommends

# --- 2. 아키텍처 기반으로 브라우저 설치 ---
ARCH=$(dpkg --print-architecture)
echo "INFO: 감지된 아키텍처: $ARCH"

if [ "$ARCH" = "amd64" ]; then
    # amd64(x86_64) 아키텍처의 경우 Google Chrome 설치
    echo "INFO: amd64용 Google Chrome 설치 중..."
    apt-get install -y wget gnupg
    wget -q -O - https://dl-ssl.google.com/linux/linux_signing_key.pub | apt-key add -
    echo "deb [arch=amd64] http://dl.google.com/linux/chrome/deb/ stable main" > /etc/apt/sources.list.d/google.list
    apt-get update
    apt-get install -y google-chrome-stable --no-install-recommends
    BROWSER_EXEC="google-chrome-stable"

elif [ "$ARCH" = "arm64" ]; then
    # arm64 아키텍처의 경우 Chromium 설치
    # arm64에서는 Google Chrome을 사용할 수 없으므로 오픈 소스 버전인 Chromium을 설치합니다.
    echo "INFO: arm64용 Chromium 설치 중..."
    apt-get install -y chromium --no-install-recommends
    BROWSER_EXEC="chromium"

else
    echo "ERROR: 지원되지 않는 아키텍처: $ARCH" >&2
    exit 1
fi

# --- 3. 정리 및 확인 ---
# 이미지 크기를 줄이기 위해 apt 캐시 정리
echo "INFO: apt 캐시 정리 중..."
rm -rf /var/lib/apt/lists/*

# 설치된 브라우저 실행 파일의 경로 찾기
chrome_path=$(which "$BROWSER_EXEC")

# 브라우저가 성공적으로 설치되었는지 확인하고 실행 파일 이동
if [ -n "$chrome_path" ]; then
    echo "INFO: 브라우저 실행 파일이 다음 위치에 있음: $chrome_path"

    # --- 시작: 수정 ---
    # arm64에서는 JS 코드와의 호환성을 위해 'chromium'의 이름을 'google-chrome-stable'로 변경합니다.
    # amd64에서는 'google-chrome-stable'을 현재 디렉토리로 이동합니다.
    mv "$chrome_path" ./google-chrome-stable
    echo "INFO: 실행 파일을 ./google-chrome-stable로 이동했습니다."
    # --- 종료: 수정 ---

else
    echo "ERROR: 경로에서 브라우저 실행 파일 '$BROWSER_EXEC'을 찾을 수 없습니다." >&2
    exit 1
fi

echo "✅ 설정이 완료되었습니다. 이제 브라우저 실행 파일을 ./google-chrome-stable에서 사용할 수 있습니다."
-
PUPPETEER_SKIP_CHROMIUM_DOWNLOAD=true npm install puppeteer: Google Chrome이 대신 사용되므로 Chromium을 다운로드하지 않고 Puppeteer를 설치합니다. -
후속 명령은 시스템 패키지 목록을 업데이트하고, 필요한 도구(
wget및gnupg와 같은)를 설치하고, Google Chrome 설치를 위해 Google의 서명 키 및 ��리포지토리를 추가합니다. -
apt-get install -y google-chrome-stable: Google Chrome이 브라우저에서 제대로 실행되도록 필요한 글꼴 및 라이브러리와 함께 Google Chrome을 설치합니다. -
그런 다음 스크립트는 설치된
google-chrome-stable실행 파일을 찾아 Puppeteer가 사용할 수 있도록 현재 디렉토리로 이동합니다.
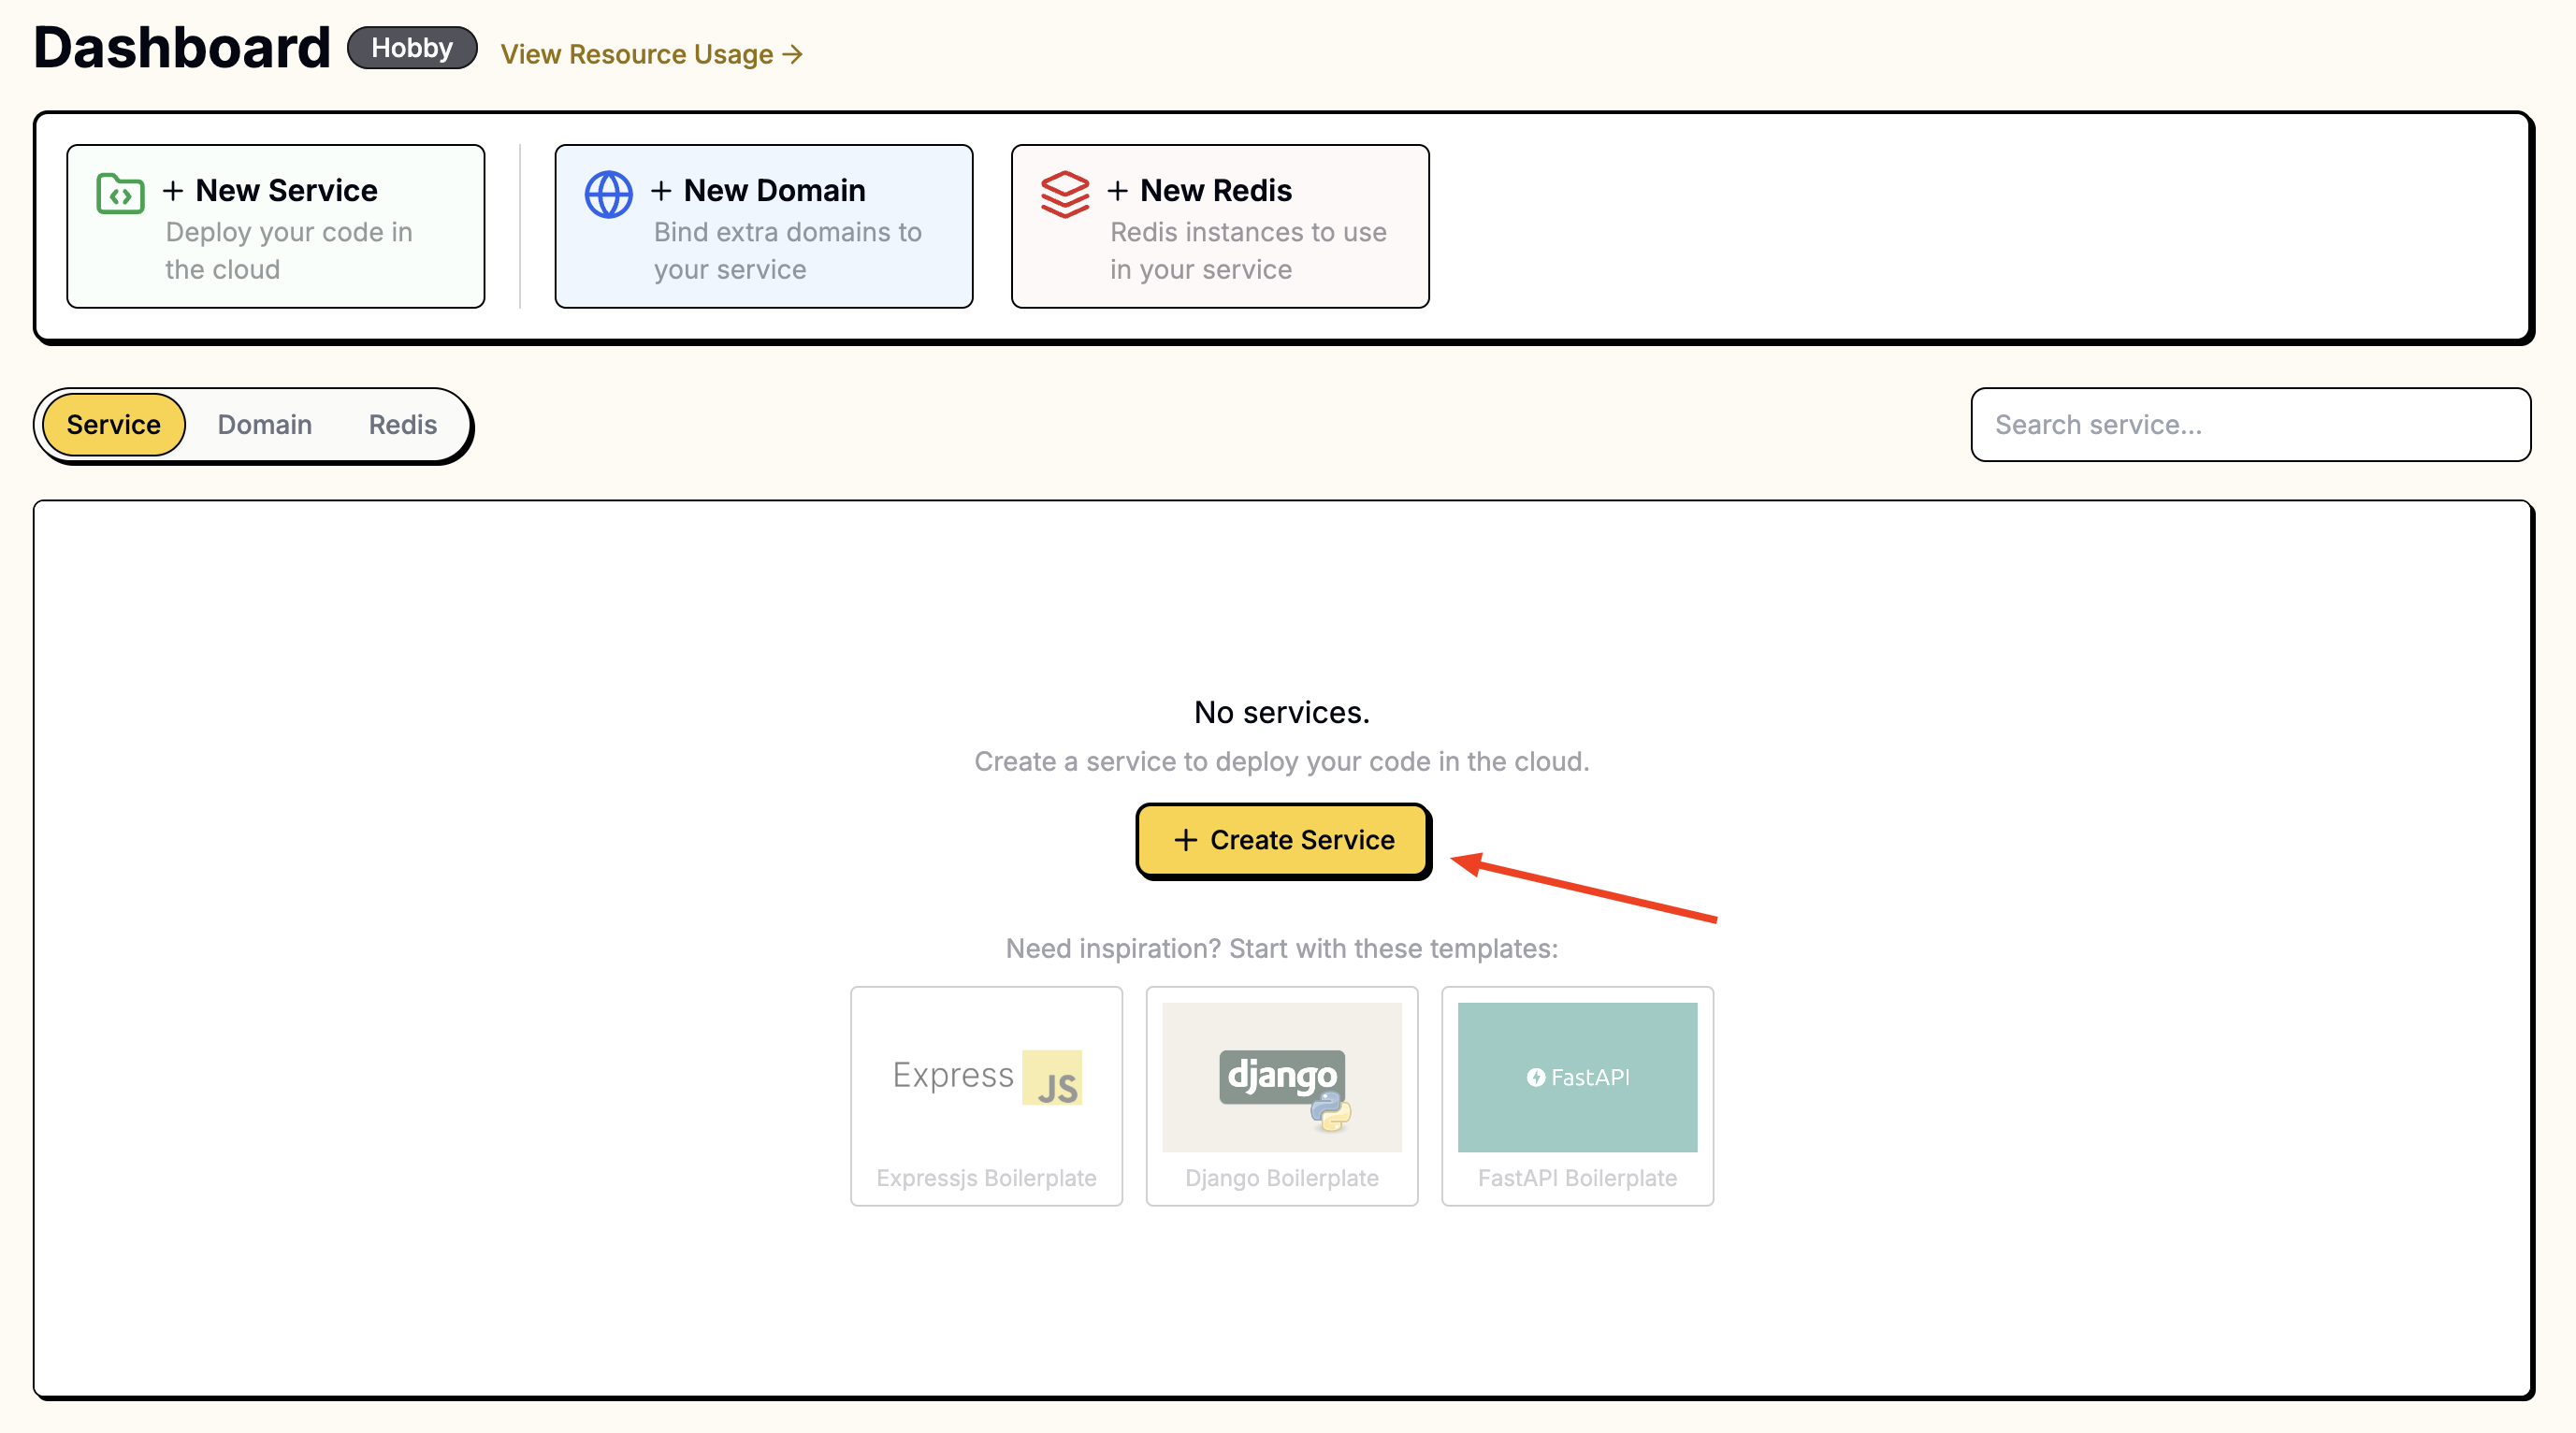
2. Leapcell 대시보드에서 서비스 생성 및 리포지토리 연결
Leapcell 대시보드로 이동하여 새 서비스 버튼을 클릭합니다.
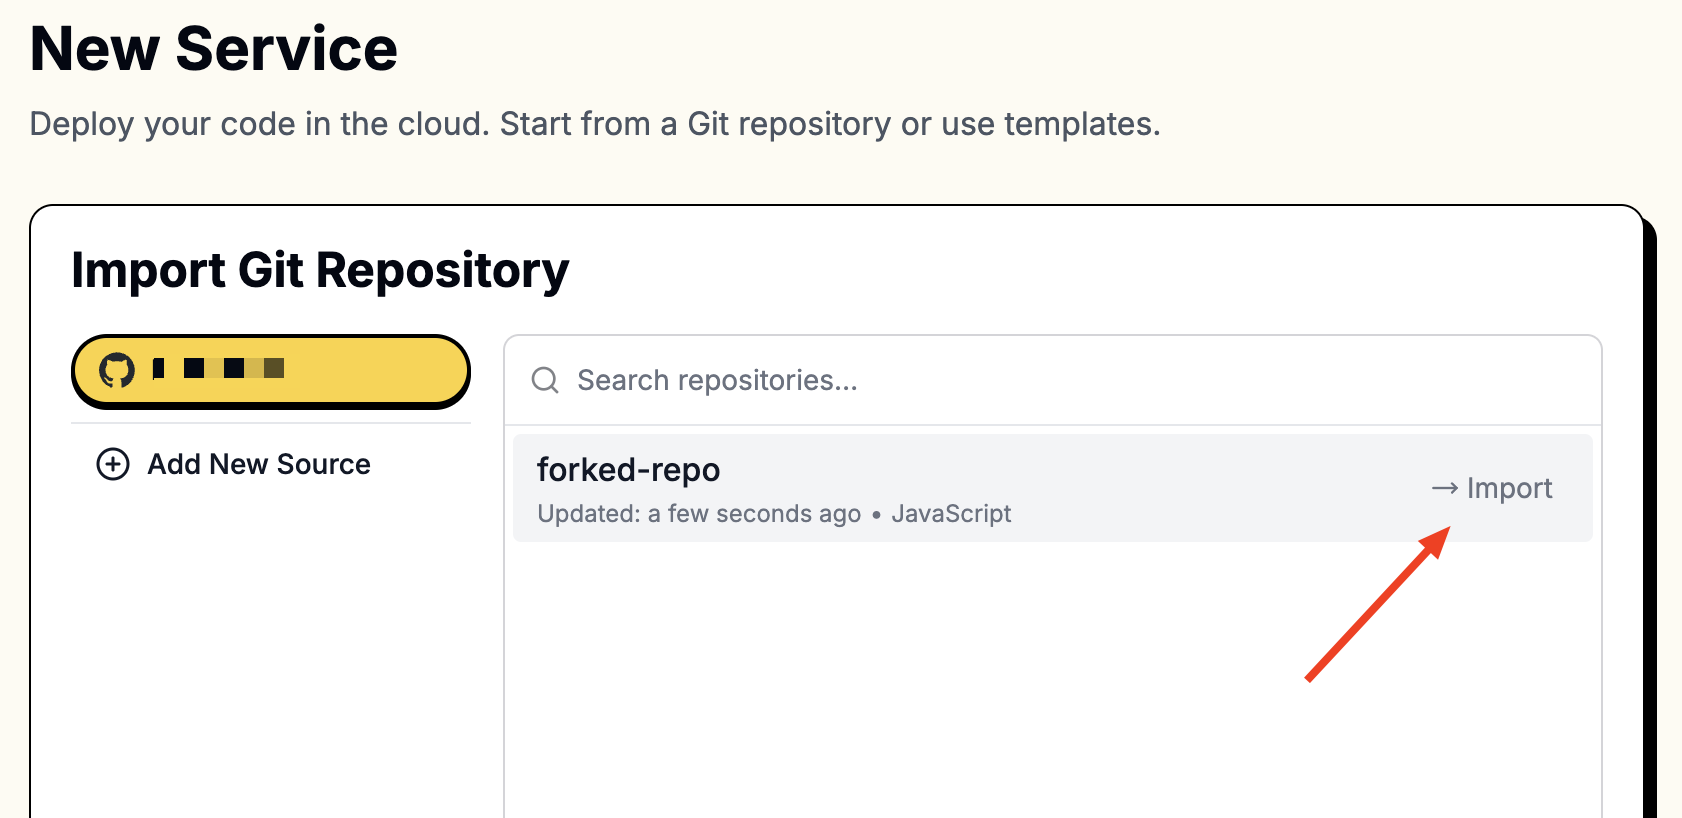
"새 서비스" 페이지에서 방금 포크한 리포지토리를 선택합니다.
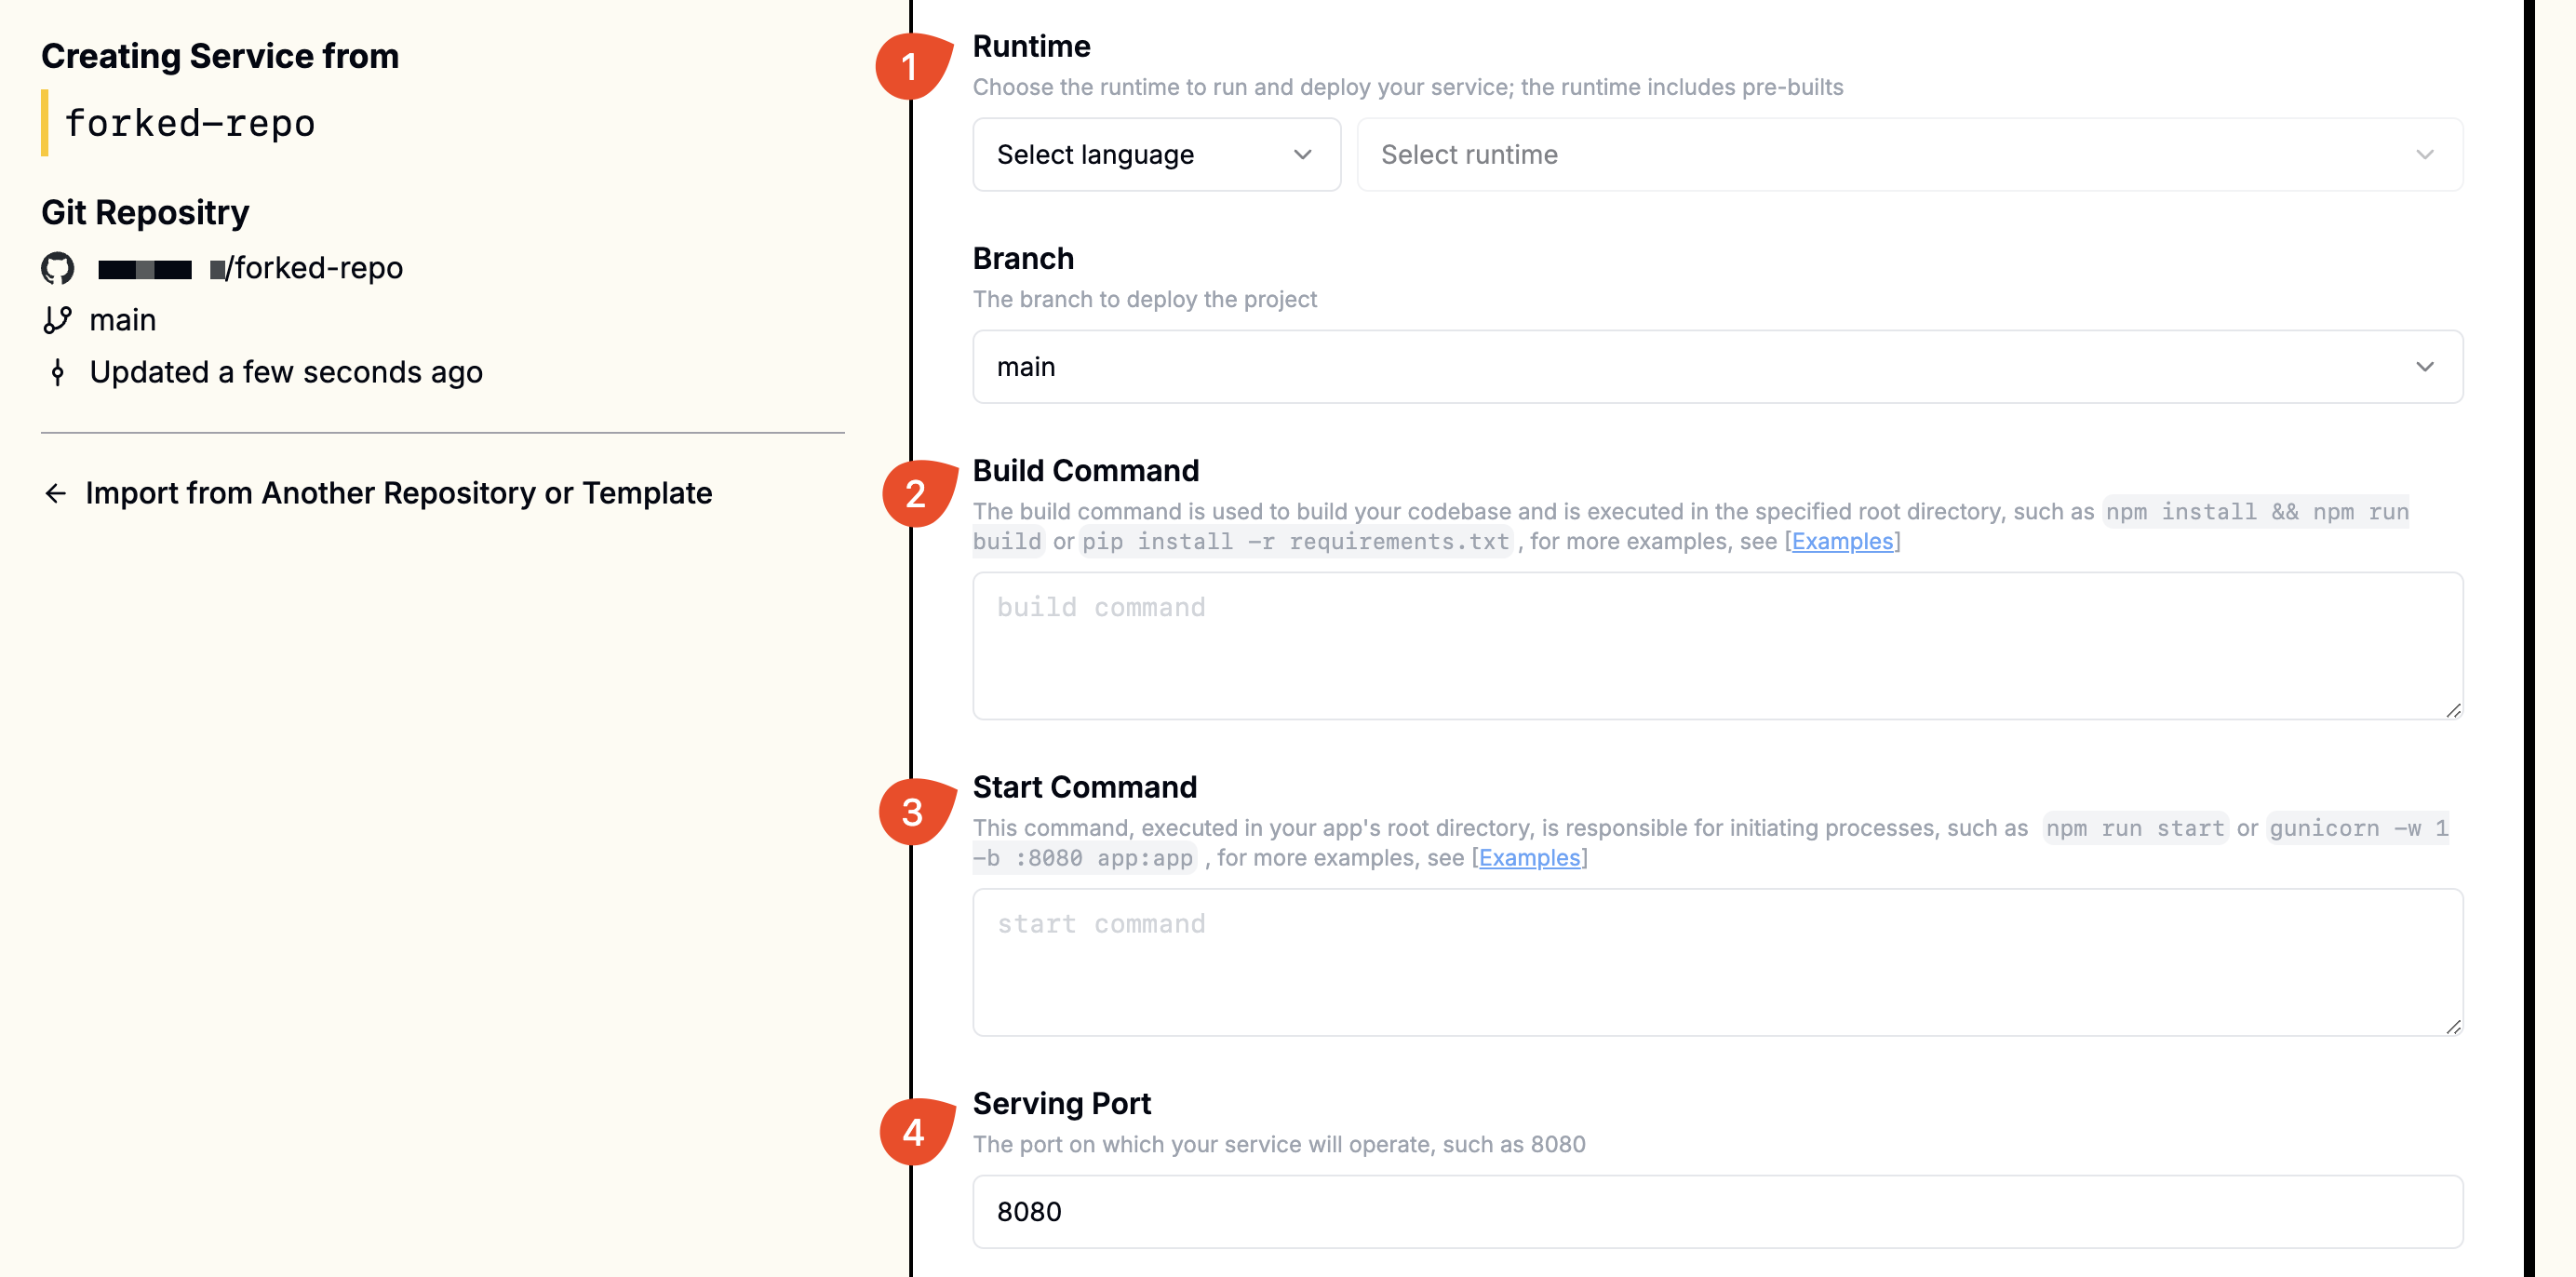
3. 서비스 생성 중 다음 값 입력
Puppeteer는 헤드리스 Chromium 브라우저가 필요하므로 종속성을 설치해야 합니다. 설치 명령을 별도로 실행하는 것이 좋습니다.
최종 설치 명령은 다음과 같습니다.
sh prepare_puppeteer_env.sh && npm install
이 예에서는 Express 앱을 사용하여 Puppeteer 작업을 제어합니다. 시작 명령은 npm run start입니다.
| 필드 | 값 |
|---|---|
| 런타임 | Node.js (모든 버전) |
| 빌드 명령 | sh prepare_puppeteer_env.sh && npm install |
| 시작 명령 | npm run start |
| 포트 | 8080 |
해당 필드에 이러한 값을 입력합니다.
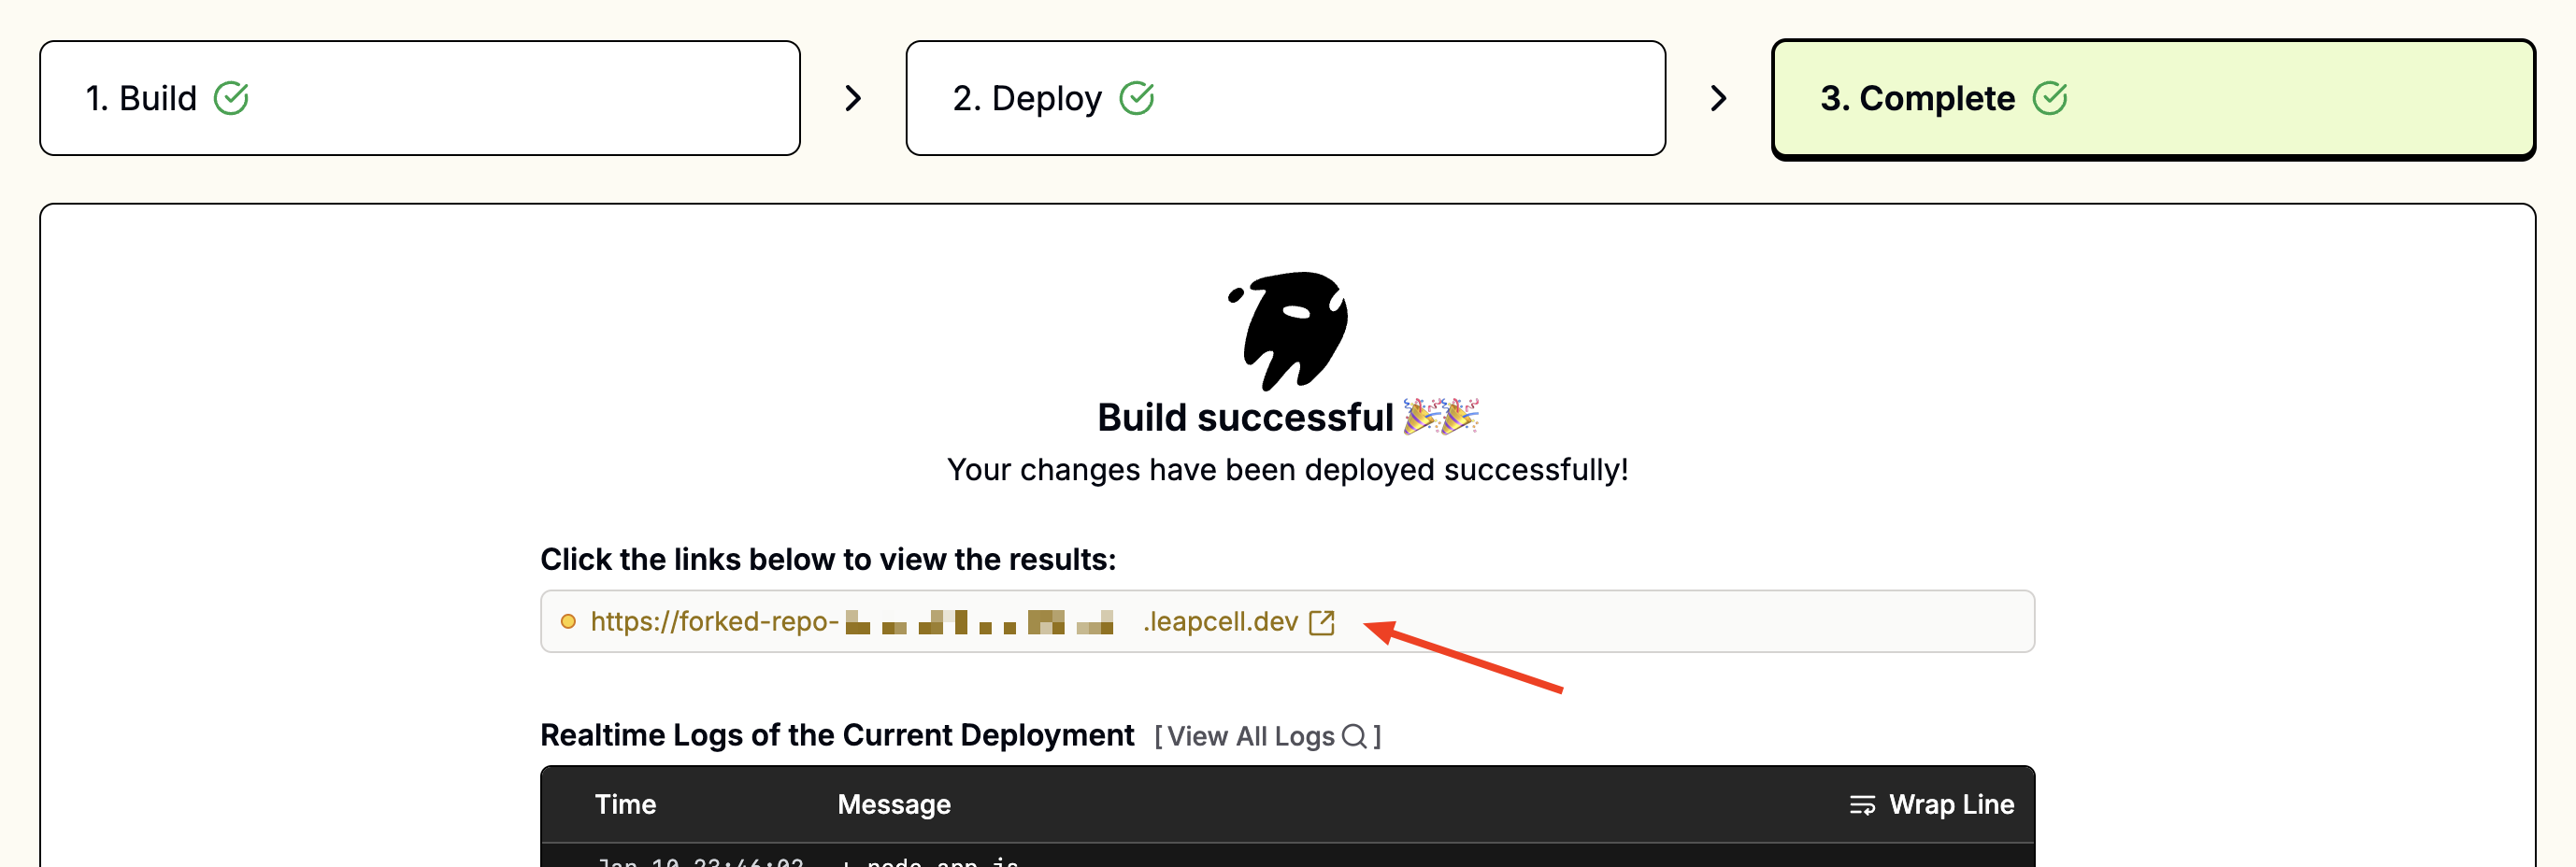
4. 앱에 액세스
배포되면 배포 페이지에 foo-bar.leapcell.dev와 같은 URL이 표시됩니다. 도메인을 방문하여 애플리케이션을 테스트합니다.
지속적 배포
연결된 브런치에 푸시할 때마다 자동으로 빌드 및 배포가 트리거됩니다. 실패한 빌드는 안전하게 취소되고 현재 버전은 다음 성공적인 배포가 있을 때까지 라이�브 상태로 유지됩니다.
지속적 배포에 대해 자세히 알아보세요.