Eine Puppeteer App auf Leapcell bereitstellen
Wenn das Problem mit der folgenden Lösung nicht behoben werden kann, kannst du dich unserem Leapcell Discord Community für weitere Unterstützung anschließen.
Du kannst einen Puppeteer Service auf Leapcell bereitstellen, um Screenshots, PDFs zu erstellen, Single Page Apps zu crawlen oder das Testen deines Frontend-Codes zu automatisieren.
Du benötigst ein GitHub-Konto, um fortzufahren. Wenn du noch keins hast, kannst du es auf der GitHub-Website erstellen.
1. Forke das puppeteer-crawler auf GitHub
Repo: puppeteer-crawler
Hier ist ein einfaches Puppeteer-Skript, um einen Screenshot einer Webseite zu erstellen:
const express = require('express');
const app = express();
// Importiere Puppeteer für die Browserautomatisierung
const puppeteer = require('puppeteer');
const bodyParser = require('body-parser');
const base64 = require('base64-js');

// Setze EJS als Template-Engine
app.set('view engine', 'ejs');
// Setze das Verzeichnis für die Views
app.set('views', __dirname + '/views');

// Verwende body-parser, um Formulardaten zu parsen
app.use(bodyParser.urlencoded({ extended: true }));

// Behandle GET-Anfragen und rendere die Startseite
app.get('/', (req, res) => {
  res.render('success', {
    url: 'https://news.ycombinator.com',
    screenshot_base64: '',
    links: [],
    page_title: null,
  });
});

// Behandle POST-Anfragen, um einen Screenshot zu erstellen
app.post('/', async (req, res) => {
  // Hole die URL aus dem Formular, standardmäßig Hacker News
  let url = req.body.url || 'https://news.ycombinator.com';
  // Füge 'https://' hinzu, wenn die URL nicht mit 'http' beginnt
  if (!url.startsWith('http')) {
    url = 'https://' + url;
  }

  let browser;
  try {
    // Starte einen Headless Chrome Browser mit bestimmten Argumenten
    browser = await puppeteer.launch({
      headless: true, // Führe den Browser im Headless-Modus aus
      args: [
        '--single-process',
        '--no-sandbox',
        '--disable-setuid-sandbox',
        '--disable-gpu',
        '--no-zygote',
        '--disable-dev-shm-usage',
      ],
      // Verwende die stabile Version von Chrome
      // Verwende einen bestimmten Pfad zur ausführbaren Chrome-Datei, da der Standardpfad möglicherweise nicht funktioniert.
      // Wir müssen die ausführbare Chrome-Datei herunterladen und in das Projektverzeichnis legen.
      executablePath: './google-chrome-stable',
    });
    // Erstelle eine neue Browserseite
    const page = await browser.newPage();
    // Navigiere zur angegebenen URL und warte, bis das Netzwerk im Leerlauf ist
    await page.goto(url, { waitUntil: 'networkidle2', timeout: 0 });
    // Mache einen Screenshot der Seite
    const screenshot = await page.screenshot();
    // Hole den Seitentitel
    const page_title = await page.title();

    // Extrahiere alle Links und Textinhalte der <a>-Tags
    const links_and_texts = await page.evaluate(() => {
      const anchors = document.querySelectorAll('a');
      return Array.from(anchors).map((anchor) => {
        const text = anchor.textContent.replace(/<[^>]*>/g, '').trim();
        return {
          href: anchor.href,
          text: text,
        };
      });
    });

    // Konvertiere den Screenshot in einen Base64-String
    const screenshot_base64 = base64.fromByteArray(screenshot);

    // Rendere die Erfolgsseite mit relevanten Daten
    res.render('success', {
      url,
      page_title,
      screenshot_base64,
      links: links_and_texts,
    });
  } catch (e) {
    // Schließe den Browser, wenn ein Fehler auftritt
    if (browser) {
      await browser.close();
    }
    // Rendere die Fehlerseite mit der Fehlermeldung
    res.render('error', { error_message: e.message });
  } finally {
    // Stelle sicher, dass der Browser nach allen Operationen geschlossen wird
    if (browser) {
      await browser.close();
    }
  }
});

// Setze den Port, verwende die Umgebungsvariable PORT oder standardmäßig 8080
const port = process.env.PORT || 8080;
// Starte den Server
app.listen(port, () => {
  console.log(`Server läuft auf Port ${port}`);
});
Voraussetzungen
Bevor du die Anwendung ausführst, musst du die Puppeteer-Umgebung vorbereiten. Führe dazu das folgende Skript aus:
sh prepare_puppeteer_env.sh
Dies wird:
- Puppeteer und seine Abhängigkeiten installieren (ohne Chromium herunterzuladen, da wir Google Chrome verwenden werden).
- Google Chrome in deiner Umgebung installieren.
- Die notwendigen Abhängigkeiten für die Ausführung von Puppeteer einrichten.
Projektstruktur
.
├── LICENSE                           # Lizenzdatei für das Projekt
├── package.json                      # Enthält Metadaten und Abhängigkeiten für das Node.js-Projekt
├── prepare_puppeteer_env.sh           # Skript zum Einrichten der Puppeteer-Umgebung
└── src
    ├── app.js                        # Haupteinstiegspunkt der Anwendung mit Express und Puppeteer
    └── views
        ├── error.ejs                 # Fehlervorlage, die angezeigt wird, wenn etwas schief geht
        ├── partials
        │   └── header.ejs            # Headervorlage, die über Seiten hinweg gemeinsam genutzt wird
        └── success.ejs               # Erfolgsmeldungsvorlage mit den gescrapten Links
Anwendung ausführen
Sobald du die Umgebung vorbereitet hast, kannst du den Webdienst mit dem folgenden Befehl starten:
npm start
Der Dienst ist unter http://localhost:8080 verfügbar, und du kannst die URL der Seite eingeben, die du scrapen möchtest. Es wird eine Liste aller Links auf dieser Seite zurückgegeben.
Erklärung von prepare_puppeteer_env.sh
Dieses Skript ist verantwortlich für das Einrichten der Umgebung, die für die Ausführung von Puppeteer erforderlich ist. Hier ist eine Aufschlüsselung dessen, was jede Zeile bewirkt:
#!/bin/bash

# Beende sofort, wenn ein Befehl mit einem Status ungleich Null beendet wird
set -e

# --- 1. Allgemeines Setup ---
# Installiere Puppeteer, ohne das mitgelieferte Chromium herunterzuladen
PUPPETEER_SKIP_CHROMIUM_DOWNLOAD=true npm install puppeteer

# Aktualisiere die apt-Liste und installiere gängige Schriftarten und Bibliotheken, die von beiden Browsern benötigt werden
echo "INFO: Installiere gängige Schriftarten und Bibliotheken..."
apt-get update
apt-get install -y \
    fonts-ipafont-gothic \
    fonts-wqy-zenhei \
    fonts-thai-tlwg \
    fonts-kacst \
    fonts-freefont-ttf \
    libxss1 \
    --no-install-recommends

# --- 2. Installiere den Browser basierend auf der Architektur ---
ARCH=$(dpkg --print-architecture)
echo "INFO: Erkannte Architektur: $ARCH"

if [ "$ARCH" = "amd64" ]; then
    # Für die amd64 (x86_64) Architektur, installiere Google Chrome
    echo "INFO: Installiere Google Chrome für amd64..."
    apt-get install -y wget gnupg
    wget -q -O - https://dl-ssl.google.com/linux/linux_signing_key.pub | apt-key add -
    echo "deb [arch=amd64] http://dl.google.com/linux/chrome/deb/ stable main" > /etc/apt/sources.list.d/google.list
    apt-get update
    apt-get install -y google-chrome-stable --no-install-recommends
    BROWSER_EXEC="google-chrome-stable"

elif [ "$ARCH" = "arm64" ]; then
    # Für die arm64 Architektur, installiere Chromium
    # Google Chrome ist nicht für arm64 verfügbar, daher installieren wir die Open-Source-Version, Chromium
    echo "INFO: Installiere Chromium für arm64..."
    apt-get install -y chromium --no-install-recommends
    BROWSER_EXEC="chromium"

else
    echo "ERROR: Nicht unterstützte Architektur: $ARCH" >&2
    exit 1
fi

# --- 3. Bereinigung und Verifizierung ---
# Bereinige den apt-Cache, um die Image-Größe zu reduzieren
echo "INFO: Bereinige den apt-Cache..."
rm -rf /var/lib/apt/lists/*

# Finde den Pfad der installierten Browser-Executable
chrome_path=$(which "$BROWSER_EXEC")

# Überprüfe, ob der Browser erfolgreich installiert wurde, und verschiebe die ausführbare Datei
if [ -n "$chrome_path" ]; then
    echo "INFO: Browser-Executable gefunden unter: $chrome_path"

    # --- START: MODIFIKATION ---
    # Benenne unter arm64 'chromium' in 'google-chrome-stable' um, um die Kompatibilität mit dem JS-Code zu gewährleisten.
    # Unter amd64 verschiebt dies nur 'google-chrome-stable' in das aktuelle Verzeichnis.
    mv "$chrome_path" ./google-chrome-stable
    echo "INFO: Executable nach ./google-chrome-stable verschoben"
    # --- ENDE: MODIFIKATION ---

else
    echo "ERROR: Browser-Executable '$BROWSER_EXEC' nicht im PATH gefunden." >&2
    exit 1
fi

echo "✅ Setup abgeschlossen. Die Browser-Executable ist jetzt unter ./google-chrome-stable verfügbar"
-
PUPPETEER_SKIP_CHROMIUM_DOWNLOAD=true npm install puppeteer: Dies installiert Puppeteer, ohne Chromium herunterzuladen, da stattdessen Google Chrome verwendet wird. -
Die nachfolgenden Befehle aktualisieren die Systempaketliste, installieren die notwendigen Tools (wie
wgetundgnupg) und fügen Googles Signierschlüssel und Repository für die Installation von Google Chrome hinzu. -
apt-get install -y google-chrome-stable: Dies installiert Google Chrome zusammen mit den notwendigen Schriftarten und Bibliotheken, um sicherzustellen, dass Puppeteer ordnungsgemäß mit dem Browser ausgeführt wird. -
Das Skript findet und verschiebt dann die installierte
google-chrome-stableExecutable in das aktuelle Verzeichnis, damit Puppeteer sie verwenden kann.
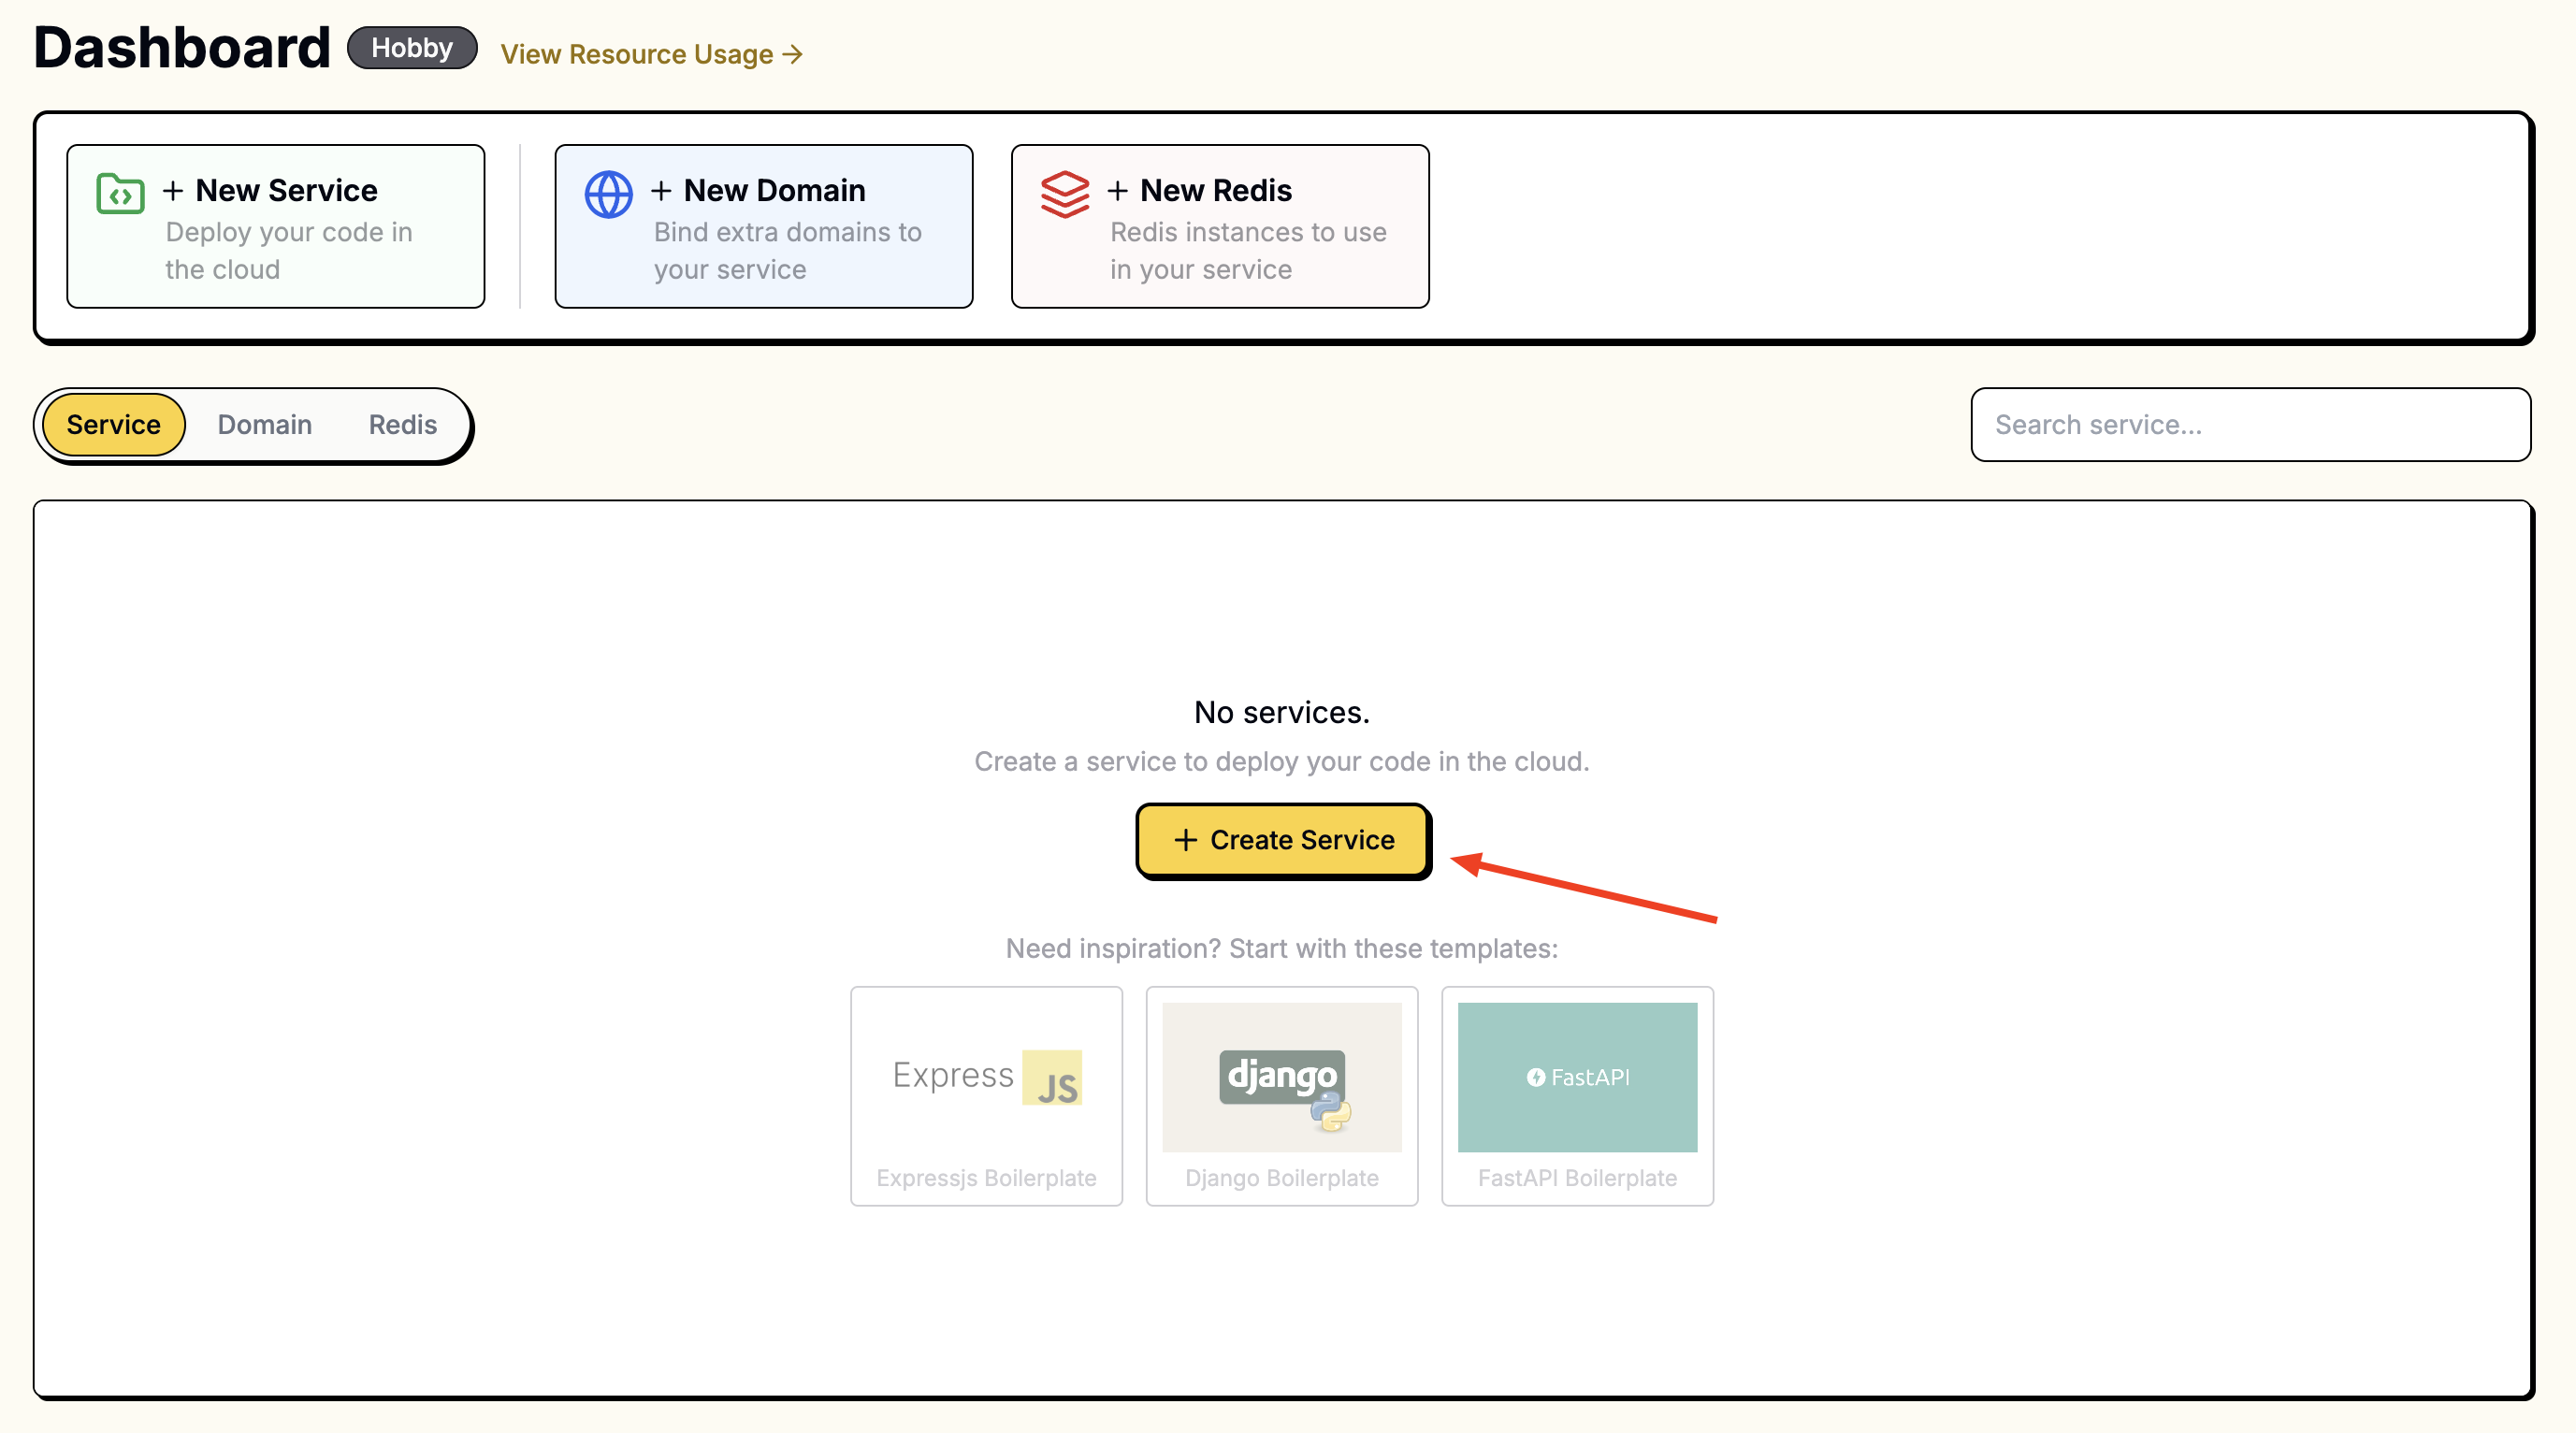
2. Erstelle einen Service im Leapcell Dashboard und verbinde dein Repo
Gehe zum Leapcell Dashboard und klicke auf die Schaltfläche Neuer Service.
Wähle auf der Seite "Neuer Service" das Repository aus, das du gerade geforkt hast.
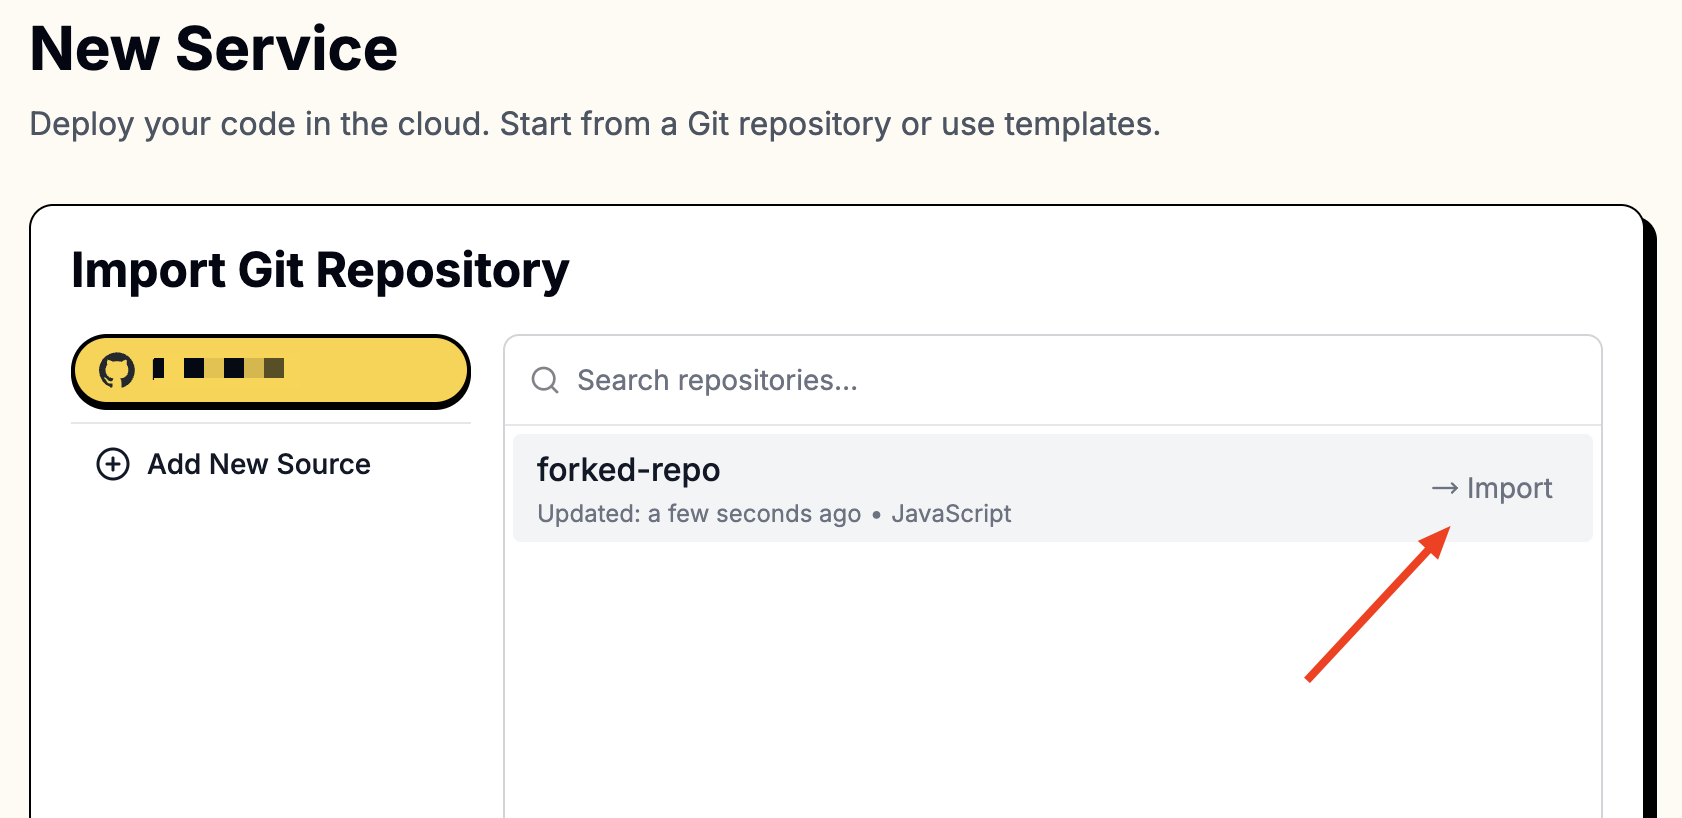
Um auf deine Repositories zuzugreifen, musst du Leapcell mit deinem GitHub-Konto verbinden.
Befolge diese Anweisungen, um dich mit GitHub zu verbinden.
Sobald die Verbindung hergestellt ist, werden deine Repositories in der Liste angezeigt.
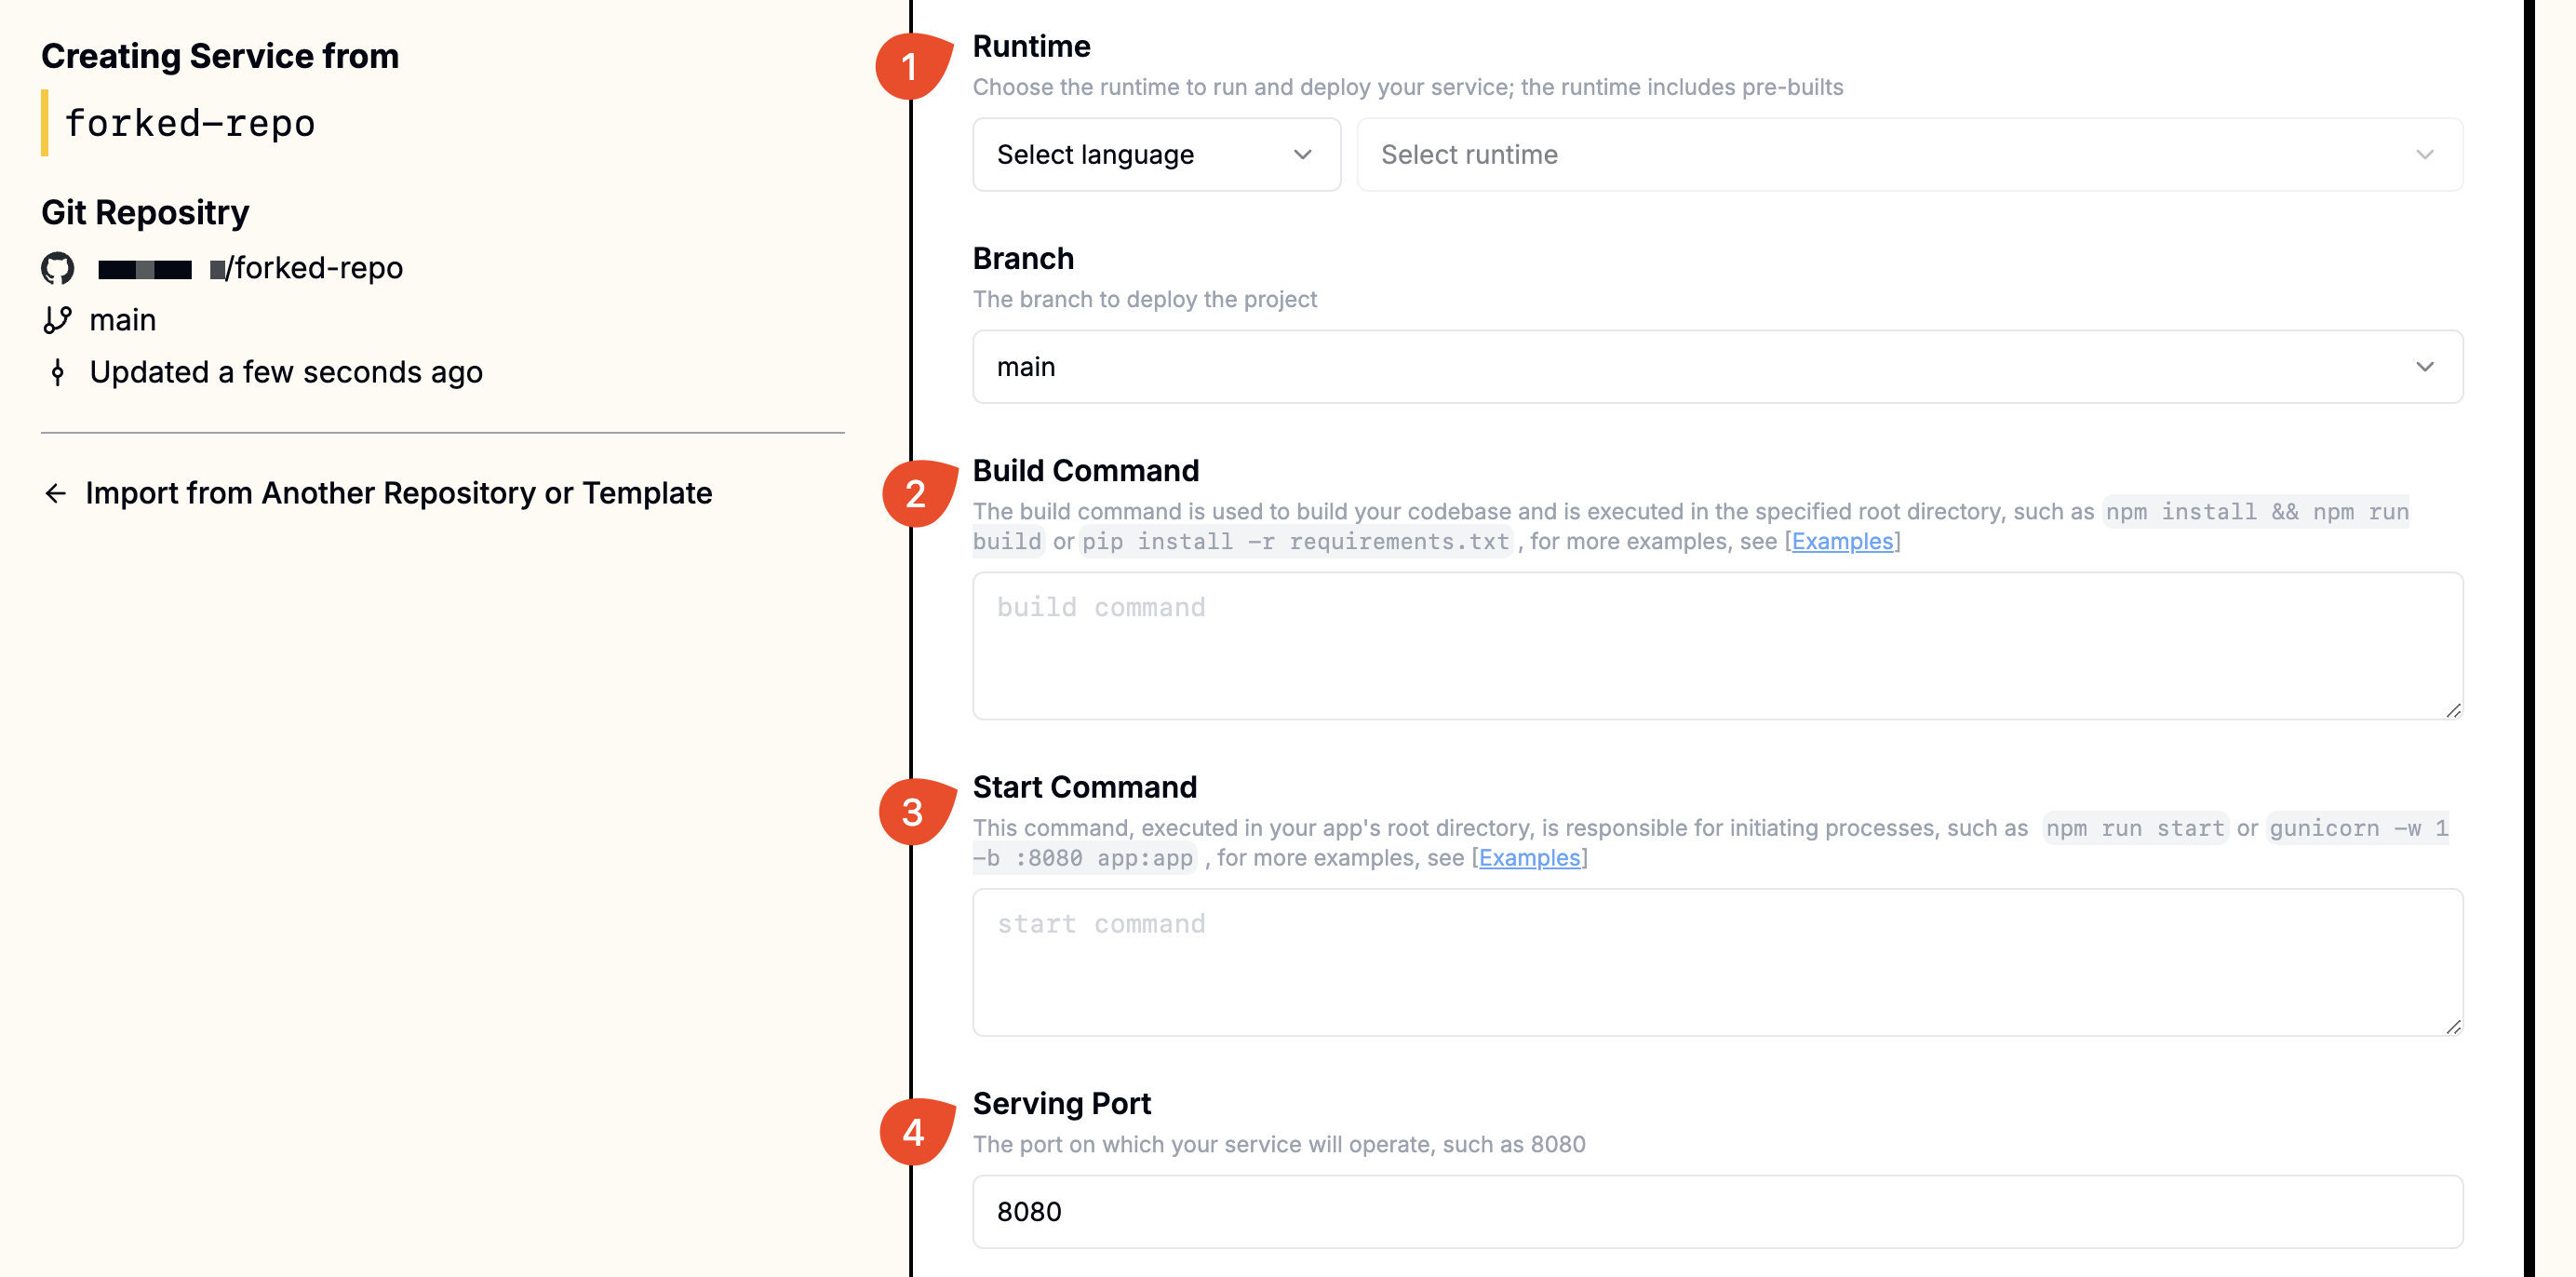
3. Fülle die folgenden Werte während der Serviceerstellung aus
Da Puppeteer einen Headless Chromium Browser benötigt, musst du Abhängigkeiten installieren. Es wird empfohlen, den Installationsbefehl separat auszuführen.
Hier ist der endgültige Installationsbefehl:
sh prepare_puppeteer_env.sh && npm install
In diesem Beispiel verwenden wir eine Express-App, um Puppeteer-Operationen zu steuern. Der Startbefehl lautet npm run start.
| Feld | Wert |
|---|---|
| Runtime | Node.js (beliebige Version) |
| Build Command | sh prepare_puppeteer_env.sh && npm install |
| Start Command | npm run start |
| Port | 8080 |
Geben diese Werte in die entsprechenden Felder ein.
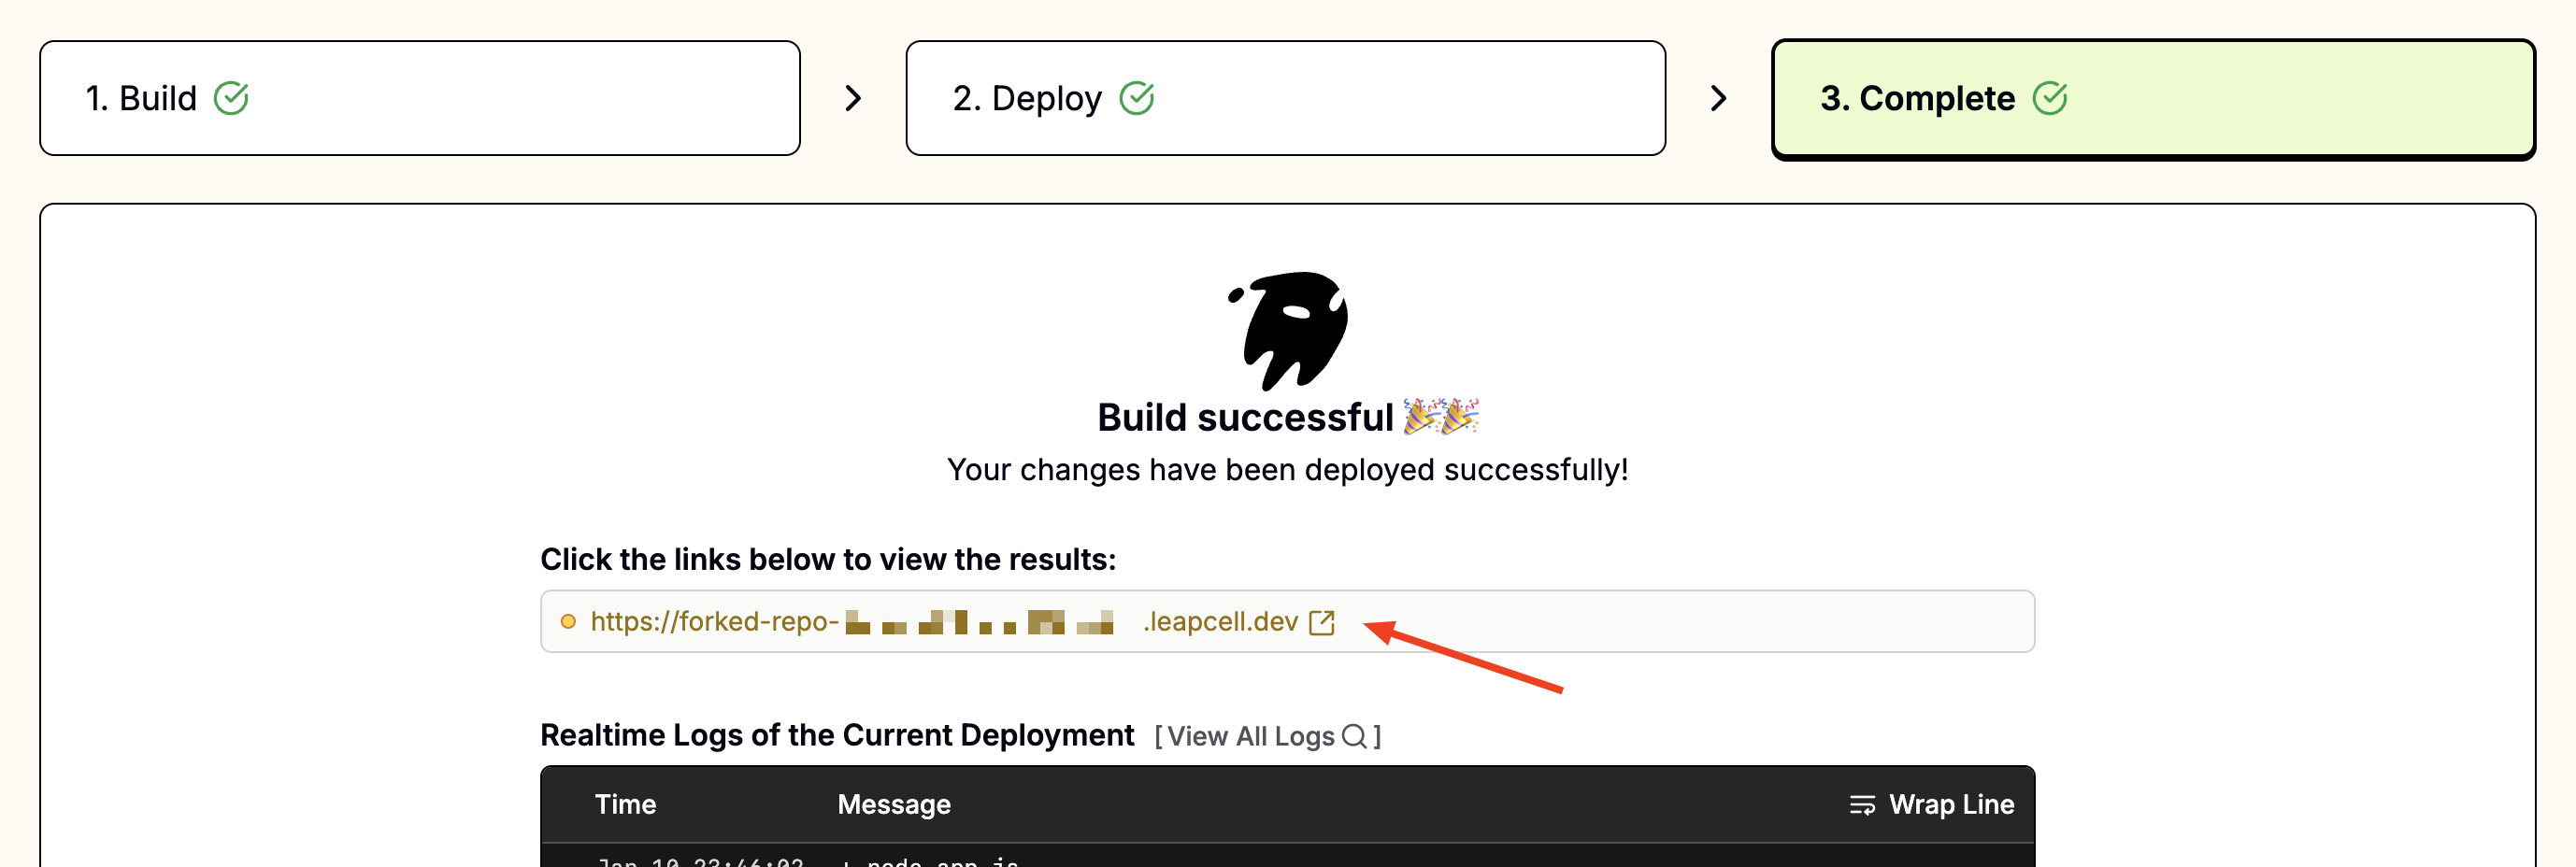
4. Greife auf deine App zu
Sobald die Bereitstellung abgeschlossen ist, siehst du eine URL wie foo-bar.leapcell.dev auf der Bereitstellungsseite. Besuche die Domain, um deine Anwendung zu testen.
Kontinuierliche Bereitstellungen
Jeder Push in den verknüpften Branch löst automatisch einen Build und eine Bereitstellung aus. Fehlgeschlagene Builds werden sicher abgebrochen, und die aktuelle Version bleibt bis zur nächsten erfolgreichen Bereitstellung live.
Erfahre mehr über Kontinuierliche Bereitstellungen.